
Monday, November 29, 2010
I am still here!!
Just a quick note to let you know I am still around! I have been so busy with the DH home that I havent had much time to get in here and blog. But dont worry I am still here!! OH and BTW I now am the proud owner of a Plum Expression AND a Gypsy!!! Woot woot!
Tuesday, November 16, 2010
Help me help you


Please stop by Karels blog http://karelj.blogspot.com/ and vote for either of my projects!! Pleaseeeeeeeeeeeee....puuulllleeeeeezzzzzzzzzzzzzzzzzz ok...do it....right now.....ok now.....how about now??......do it or the snowman gets it.....thats right I am resorting to threats.....Thanks in advance because I know you will go vote :D :D Right ?! Save a snowmans life
Sunday, November 14, 2010
'Let It Snow'
~*As I type this it is snowing out :D*~


Heya Everyone! I had a chance back on the 11th of this month to sit in on a free class offered by Cricut. When I signed up for this class and saw they were going to be making a banner my wheels got a turnin'. Yes there was smoke and a lot of screeching but eventually they stopped resisting and turned. ;) When I signed up they listed the items you would need to complete the same banner they were making. I didnt have anything that they had listed but it didnt keep me from sitting in to get some tips and ideas. I had thought for a week or so on what I want to make for my banner. If you follow my blog or know me then you would know my choice was simple! I chose to do a winter themed banner that reads 'Let it Snow'. With my obsession being snowflakes I jumped all over using as many snowflakes as I could. I asked my crafty partner in crime (Kristine) if I could use her Expression because I only have the baby Cricut. I started out with picking 3 different shades of blue paper. The words 'Let It Snow' has 9 letters so I would need 9 sheets of 8x11 (3 pages of each shade) or a 12x12 will fit 2 on each sheet if you roate it.
I pluged in the 'Celebrations' cartridge and and use the foundation of the triangular banner on the bottom right of the key overlay. I set the Chicut to 9 inches and cut out 9 banner triangles.
I then picked out 5 different patterns of winter type paper.
I stuck them down one at a time on the cutting mat and set the Cricut to cut at 8 1/2 inches on the same banner foundation as above. It still looked a little 'sharp ' along the edges to me so I got out my scalloped edged scissors from X-acto and cut the edges of both the blue and patterned paper banners. I looked through a few cartridges and found that Doodlecharms, Accent Essentials and Designers Calendar has snowflakes in them. So I used thoes cartridges to cut out a bunch of miscellaneous sizes, white and shades of blue snowflakes. I glued the snowflakes to the pattered paper banner pieces. Then I plugged in the George and Basic Shapes cartridge and cut out the letters at a size of 4 1/2 inches in the same shades of blue as the banners. Grabbed more white cardstock and cut the shadow image of the same letters I just cut. Glued the letters and their shadows together. I outlined the white part of the shadow letter with irridescent glitter glue.
After the glitter was dry I got out my Helmar Liquid Scrap Dots and glued the letters to the patterned paper banner with snowflakes already glued down.
It still didnt look like I wanted it to look yet...not only do I have an obsession with snowflakes but I bathe in glitter on a regular basis. I think glitter is the answer to world peace. Im not sayin, Im just sayin. So I got out some blue glitter glues and went to work.
I plugged in Accent Essentials again and cut out the word divider snowflakes at 5 inches in light blue cardstock then did it in shadow in dark blue cardstock. Took out Accent Essentials and pluged in George and Basic Shapes and cut out a 3 inch circle in a teal blue and constructed the snowflakes.
After all that, I layed it all out across my floor. Let me tell you something here. For some very strange and odd reason when ever anything is layed on the floor in my house my 2 dogs and my 2 kids think its an invite to come and lay on it or run past it so it flips over or sit on it. I have no idea what draws them to my stuff, on the floor, but it happens EVERY TIME! Back to the instructions.....so I layed it out on the floor so that I could get a general feel of how it will look in its 'banner' form.
Pleased with the results I sifted through my ribbon tin (It is an old vintage tin that was used for ribbon candy. Thought it was kinda fitting :D) and pulled out all the blue ribbon I could find. And tied the banner pieces together.
And the result was a fun and fitting banner I can leave up for pretty much 6 months out of the year here :D :D
I hope that inspires you to make your own fun banner!! If you have any questions about any of the steps you can leave me a comment here or on my own blog! Thanks!!
Friday, November 12, 2010
Thanks card

Blah! Ever have one of those days when the 'word of the day' is blah. Thats today for me. Lol I know I have stuff to do but I dont wanna do it. Its Friday so I have art to teach and good thing I prepped all my art projects for the month or else the kids would be getting a white sheet of peper and I would be telling them to do what ever they want HA! You know, interesting fact about that, it really is funny to watch kids do art. Especially when you give them a sample piece. Some kids will try their hardest to copy yours. Some kids will see it and then make it their own some how and some kids......well.....you look at their art and wonder if they were in the class when you gave directions. We had one kid a few years ago that every time no matter what the project was he would always just take his paper and scribble all over it. With paint, marker, crayon...didnt matter the medium. We would show the sample and then when we would pick his up it was just a scribble and he would say it looked just like the sample! One time we were painting scarecrows. All the kids had somewhat of a figure on their paper. Even if it was a stick figure. His....just a scrazy all over scribble. So my point (if I actually have one) is its funny to see how everyone can interpret their own meaning of art. I am always toting along my fabulous bag of creativity incase I ever get a moment. And I hear SO many people say "Oh I am just not crafty. I could never do that." And I wonder.....have they actually really ever tried? I could not imagine my life with out crafts!! Wow I just got really scared about that thought. No crafting EEKKKK Well for your visual pleasure I have for you a card I made for 2 wonderful girls who sent me some Unity Stamps. Havent tried them yet because honestly....stamping.....scares me. I want to try it!! Really I do! But I am worried that I just wont do it right. So I guess I just need to get with it and DO IT!! Hey BTW enjoy your weekend and be safe!
Monday, November 8, 2010
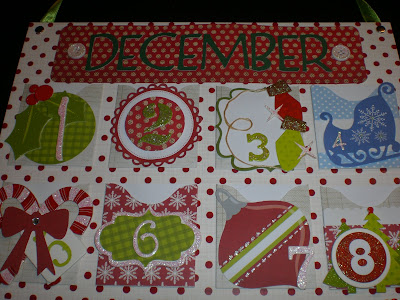
Advent Calendar done!
I finished one of my projects yesterday! My plan with this is to have my kids write 25 good things about the other one and then put one in each little envalope. Thats my plan anyways. We will see how well it works! I got this DCWV kit from JoAnns. I did a little extra to it...


Sunday, November 7, 2010
My Thankful Sign


~*Thankful Sign*~
Heya everyone! For my Fall themed project I made a sign to hang on my door. I don't have alot of Thanksgiving type decorations because we usually have snow around Halloween and snow puts me in the Christmas mood! I am notorious for putting up my Christmas tree at the beging of November. I say why only enjoy Christmas for one month when you can enjoy it for....TWO MONTHS! I even had on some Bing Crosy Christmas music today. So back to my fall project it turned out really great and I am so glad to be able to share it with you!
~*Recipe*~
~*Brown cardstock
~*Green cardstock from DCWV Super Stack 7
~*Orange strip is cut from a page in DCWV Animal Crackers
~*Purple Cardstock
~*Orange cardstock
~*Green raffia ribbon
~*2 coffee filter flowers I made myself
~*Golden colored cardstock
~*Helmar Liquid Scrap Dots
~*Martha Stewart glitter in orange and gold
~*Cricut Cartridge 'George and Basic Shapes'
~*Purple ribbon
~*Purple and Orange oil pastels
I set my Cricut to cut a 5 1/2 inch shape 3 (shift of the 'j') with the brown cardstock. I then set it to 5 inch and cut the green. Set it to 4 and cut the purple. I took my purple pastel and traced around the edges and blended the pastel. Layered the green on top of the brown and glued. Placed the stip I cut from Animal Crackers in the somewhat middle. Set my Cricut to cut three 3 inch ovals. I used the orange pastel to trace around the edges of the ovals then blended with a fancy blend-y tool (my finger). Glued the ovals together to look like a pumpkin. Added a stem and some leaves (raffia ribbon) and a brown curly thingie. Glue the pumpkin to the purple cardstock. Then applied 4 dots of Liquid Scrap Dots to the back of the purple cardstock and placed it on the brown/green base. While I waited for it to dry I cut out the word 'THANKFUL' in 1 inch letters on my Cricut and smothered them in glue and orange/gold glitter mixed. Let that dry. Cut, colored, layered and glued my coffee filter flowers. Glued my dried letters to the bottom of my base. Poked 2 holes in the top and threaded my ribbon through and tied knots in the ends. Glued my dried coffee filter flowers to the corner and VOILA! I made a sign...hangie...thingie. Thanks I hope you enjoyed taking a peek at it!
Friday, November 5, 2010
Snow Cutie card
I made this card for a Challenge over at Pink Cricut. She asked that we use Peachy Keen Stamps but since I didnt have any I just tried my best to recreate one of their snowman faces :D :D


~*Recipe*~
~*Pink, green, white and cream plain cardstock
~*Paper from DCWV Black Currant and Nana's Kitchen
~*String
~*Bling
~*Cotton balls
~*Glitter
~*Stamps from Michaels $1 section
~*Colored pencils
~*Fine tipped Sharpies
~*Gold oil pastel
*~*~*Let it snow, let it snow, let it snow*~*~*
Subscribe to:
Posts (Atom)