Thursday, January 27, 2011

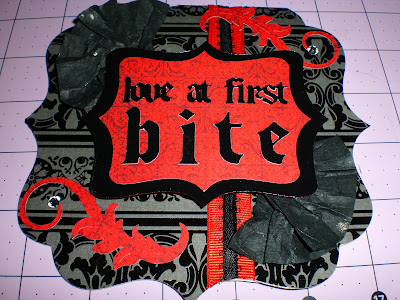
Bite me!

I had no problem thinking up my project this week and what movie I would base it on. I have been sharing the 'Twilight' series with my lucky family and figured with Valentines Day right around the corner I would tie it in somehow. I got out my handy dandy Gypsy and started to plan it all out. ~*Jen*~
~*Recipe*~
~*cardstock from DCWV
~*black glossy paper
~*black tissue paper
~*red and balck ribbon
~*2 rhinestones
~*Blackletter, Lacy Lables and Gypsy Wanderings cartridge
~*Helmar Scrap Dots
I picked out my paper. The black is actually glossy but you cant tell in this pic~

Laid out all my paper on my mat and loaded it into my Cricut, plugged in my Gypsy and hit cut~

This is how it looked after it was all cut out~

The card was made by welding together 2 tags from the Gypsy Wanderings cartridge~

Layered my tags and glued my words down. I made the words on my Gypsy by welding together the Blackletter Font.

Glued down some black and red ribbon. Also used some black tissue paper folded and pressed flat.

Used Helmars Scrap Dots to pop up my tag. Glued down the flourishes and stuck 2 little rhinestones at the end.

Added a 'bite' mark to give it a little drama.

Wednesday, January 19, 2011

Think outside the box

When we were first asked to make anything but a card I was like WHAT?!?!?! I love making cards how can I make anything but a card!!??! I went into denial then shock then I threw myself on the floor like a child kicking and screaming asking for my Mommy. Ok maybe I didnt do that (all excpet the on the floor thing...just kidding...or not... ) but I really had to stop and think of something else I wanted to make besides my beloved cards. I came up with the idea of making my daughter a Valentines Cards carrying box...thing...or whatever. Its a little box/bag she can use to carry her V-Day cards to school with and she also says she is going to use it as her 'mail box' and have the kids put their cards they are giving her into this bag/box thing. She is as happy with how it turned out as I am )and trust me she is VERY hard to please!!)

~*recipe*~
~*DCVW cardstock
~*Misc ribbon
~*Tags, Bags, Boxes and More Cartridge
~*Misc chipboard pieces
~*Fiskars scalloped edge scissors

I cut a strip of white paper with my Fiskars then folded it accordion style and glued the ends together

Cut out my box/bag on my Cricut then scored and glued it together


I then assembled the embellished flower thing in the center and glued it on with some ribbons and a little heart in the center. It will be perfect for her to carry her V-Day cards to school and look so cute sittine on her desk as her 'mail box'.


~*Jen*~


Time for Love

Valentines is the time for love. Appreciating thoes that are close to you and thoes that are far away. What better way to express your feelings with a handmade card for your loved ones?! I just love to paper craft(as I have said many times)! I cant wait to make my projects as soon as they pop into my head. It usually takes me a full day to make just one card. I cant just slap some paper together and call it good. It is a representaion of my skills and talents and I want it to look great. I want that 'wow' factor! I made this card using some embossed paper I got over 2 years ago that has sat untouched. I think it turned out well. Of course there are always a few tings that I think I would change for next time but all in all I give it the stamp of approval! ~*Jen*~


~*Recipe*~

~*black and white card stock

~*red rose embossed paper from Leaving Prints

~* misc heart cuts from my Cricut Cartridges worked up on my Gypsy

~*white lace and black yarn

~*Pink by Design stamp


I started out by picking my Valentines type colors and paper~


Planned out my cuts on my Gypsy~


Laid out my paper on my mats and cut~


Got a little paper doily for the envelope~


Filled it full of 'love'~


Put together my ribbon on my card~


Glued on a ribbon bow, the envelope and the greeting :D The result is a fun card to share with anyone!


Saturday, January 15, 2011

Fun Invites


I am lucky ebough to have both my kids birthdays with in a 2 week period. They both actually had the same due date when I was pregnant with them but Eli was born the 28th of Jan and Alli the 13th of Feb. So we usually do a joint party which sounds like it would not be too fair but my kids love having their partys together. Its like they get twice the amount of friends that show up. I was excited to make their invites this year and loved how they turned out. I used my Gypsy and was able to plot them out.
~*Recipe*
~*DCWV Cardstock from their Ultimate stack (the green with skulls and the zebra)
~*Red and pink carstock
~*Post-It craft paper in white
~*George and Basic Shapes Cartridge (flowers)
~*Gypsy Wanderings and Gypsy Font (skull and 'A')
~*Black ink (to destress the edges)
~*Black fabric paint (to make the dots on the edge of the skull invite)
~*Pink button and rhine stone to place in the middle of the flower
I made them just a single pannel and then I will flip them over and write their party info on the back. My kids cant wait to share them with their friends!!
~*Jen*~

Friday, January 7, 2011

Hubbys B-day~!


I made this card for my DH's 33rd birthday! I used the Lacy Labels cartridge and my Gypsy with the Gypsy Wanderings cartridge for the sentiment. I cant wait to use these cartridges more often! The Lacy Labes is going to be my go-to cart for this year....I CAN FEEL IT....can you feel it?....cause I CAN FEEL IT!
~*recipe*~
~*Lacy Labels cart
~*Gypsy Wanderings cart
~*DCWV carstock
~*blue and brown ribbon
~*blue fabric paint
~*Jen*~

Sunday, January 2, 2011

I hold onto everything! (ok not everything)

This week we were asked to make something either recycled or repurposed. Well I am the queen of recycling stuff. I save all my cardstock scraps. When we get wedding invites in the mail I save the paper to reuse. I also save old Christmas cards and turn them into gift tags (see below I even made a wreath out of them this year). I love saving buttons from all the old clothes we wear out as well. Finding good buttons is like finding a gold nugget to me. I save almost anything I think I can reuse in my crafting. Its kinda a strange habit of mine. I love finding things that I can take and make into something fun. For this pocket card I used some cardstock scraps from my last box project and I also used some buttons I have saved from old clothes.


First I gathered all my supplies


I took a prescored 5 1/2 x 4 1/4 inch blank card opened it up and scored on side at 2 inches


Cut in the middle down 2 inches and folded the scored part down


Got out my Fiskars paper punch and punched out the edge


Cut a piece of cardstock 3 x 4 inches and used a corner rounder to round the card and the cardstock. Glued the cardstock on the inside


Placed glue on the other inside edge


Closed the card up and cut out another 3 x 4 inch piece of cardstock and glued it to the front


Cut a 5 inch piece of ribbon and glued it down on the back side of the flap then glued down the flap


Cut out a flower from one of my pieces of scrap cardstock and glued it to the front with a button and inserted two 2 2/3 x 4 1/4 inch tags


I took some brown ink and gave the edges a little of a distressed look. Whipped out my collection of gel pens and did a faux stich around the outer edge too.


So let this be a lesson to you! One womans junk could be another womans crafting supplies!!


~*Recipe*~


~*5 1/2 x 4 1/4 inch blank card

~*Cardstock (mine was K&Co)

~*Ribbon

~*Fiskars paper punch

~*Button

~*Yarn

~*Brown ink

~*Blue gel pen


Happy 2011 and my you find your crafting supplies where you least expect it!


*~Jen*~